Create Login Screen Using TextInputLayout In An iOS App
We are here to learn about creating a login screen. This is generally the first step in creating a mobile app. This allows, user to create an account on your app and later on can authenticate the user. As it is a basic step, this article is a fit for users who want to create their own iOS app or the developers who are new to iOS mobile app development.
Here, for creating an input field we are using a placeholder attribute that allows the user to view the text inside of the Textbox by providing the hint for each text field. Also, a placeholder disappears whenever the users try to input the text in the provided text field.
However, TextInputLayout, also known as ‘Floating labels’, is a layout that does not disappear, in fact, it wraps a placeholder by displaying the clues in the form of floating text while inputting the text.
Well! You do not get an in-built TextInputLayout functionality in iOS app development. Thus, this tutorial will help iOS mobile app developers like you to initialize floating labels for your iOS apps using the ‘Swift’ programming language.
Introduction
The Signup screen of iOS mobile apps provides you with the text fields that allow you to enter the text such as:
- Password
- Age
- Email Address
- Phone Number
- Name
There is also various other personal information as well, which is required for signing up on the app. The text field takes the input in the form of numeric, special characters, and plain text. In order to open the keyboard on an iOS app, you just need to tap on the placeholder.
Now, let us get into iOS app development and take a practical step-by-step route to create a signup screen for the iOS app using TextInputLayout, which will allow you to input the user name, email address, age, and country.
Steps To Create UI In iOS App Development
- Open the Xcode in your Mac and create a new project.
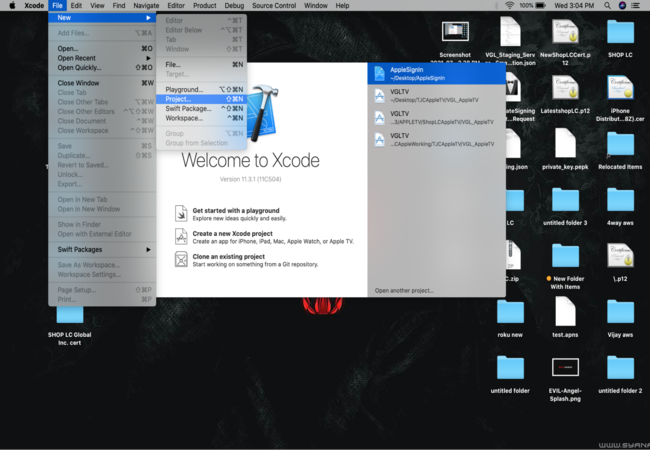
- Select “Single view app” in the iOS tab and hit the “Next” button.

- Now, enter the desired product name in the “Product Name” field, and select the ‘Swift’ programming language. Click “Next” and save your project on the hard drive.

- Great! Now, under the “Product Name” tab, go to the “Main storyboard”, and click on “View Controller”.
“View Controller” provides you with the TextInputLayout on the selected iPhone simulator along with customizable “Text Fields”, “Label”, and an action performing “Button”.
- In this step, drag and drop the required text fields and action “Button” onto your simulator from the object library.

- Now, customize your app as per the requirement by renaming the action “Button”, changing the background of the app, and many more.
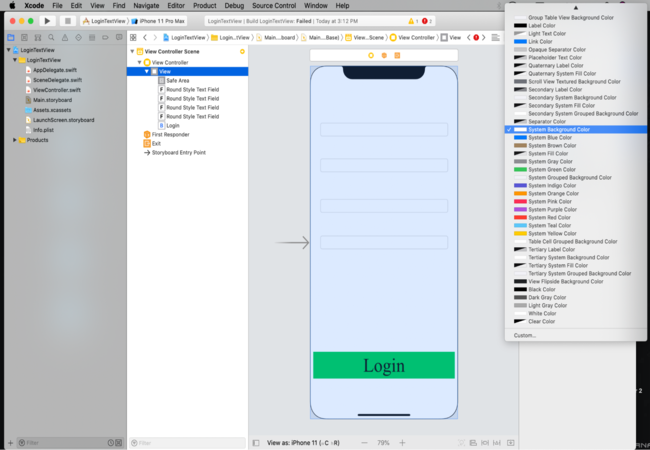
After applying the customized settings, the login screen of the app appears like this:

- Important! Do not forget to add align constraints to your app in order to avoid overlapping the created text fields during the “Build” phase.
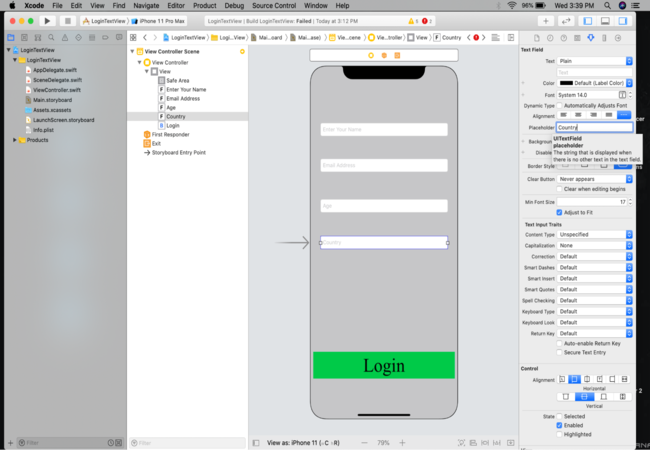
Great! Now, it’s time to write the placeholder text in the above-created text fields.
- Click on one of the text fields. Now, a customizable placeholder text field appears in the top right corner of the “View Controller”. Enter the text and align it as per your need.
Repeat this step for the remaining text fields, and “Button”.
Now, you can also customize the on-screen keyboard for each text field. For example, if you want the users to enter their age in one of the text fields, you can select a numeric keyboard from the “Keyboard” options.
Well done! You have successfully created the UI of the app using TextInputLayout.
Quickly! Let’s come to the coding part of this tutorial.
Steps To Set Up The Text Fields And Action Function In “ViewController.swift”
Follow the below-written steps in order to initialize all the “Text Fields” and a created “Button”:
- First of all, open the “Assistant” header in order to view the screen in the multiview option.
This will lead you to the “ViewController.swift” tab where we initialize “IBOutlet” for each of the text fields and “Login Button”.
Also Read:-Deep Linking in Roku

- Now, press and hold the “Control” key and drag-and-drop each text field to the “ViewController.swift” tab from your “Main storyboard” under “class ViewController: UIViewController”.
After this process, assign a unique name to each of the text fields.
The code snippet for the text fields is as follows:
1
2
3
4
5
6
7
8
9
10
11
12
13
14
import UIKit

class ViewController: UIViewController

{
@IBOutlet weak var userNameField: UITextField!

@IBOutlet weak var emailAddressField: UITextField!

@IBOutlet weak var ageField: UITextField!

@IBOutlet weak var countryField: UITextField!

}- After initializing the text fields, it’s time to initialize the action function for the created Button, which is responsible for performing the assigned action such as submit, login, return, etc.
For that, drag and drop the Button, holding the “Control” key from your “Main storyboard” to “ViewController.swift” under the function “override func didReceiveMemoryWarning()” and enter the name of this function. For example, we are using enterTapped in this tutorial.
The code snippet for the action function is as follows:
1
2
3
4
5
6
7
8
9
10
11
override func didReceiveMemoryWarning()

{

super.didReceiveMemoryWarning()

// Dispose of any resources that can be recreated.

}

@IBAction func enterTapped(_ sender: Any)
Thankfully! We have initialized the Text Fields and Login Button. Now, it’s time to understand the remaining coding part in order to build and run your project on the simulator.
Steps To Implement TextInputLayout In iOS App Development
- Go to “ViewController.swift” and assign a delegate to all of the Text Fields under the function “override func viewDidLoad()”. Follow the below-written code snippet for the same:
1
2
3
4
5
6
7
8
9
10
11
override func viewDidLoad()

{

super.viewDidLoad()

userNameField.delegate = self
emailAddressField.delegate = self
ageField.delegate = self
countryField.delegate = self
}
- Now, in this step, initialize another function “override func touchesBegan()”, which allows you to return to the login screen. This function is used to disappear the numeric keyboard, upon touching anywhere on the login screen, after inputting the “Age” in the “ageField”. The following code snippet for this function is as follows:
1
2
3
4
5
6
override func touchesBegan(_ touches: Set, with event: UIEvent?)
{

ageField.resignFirstResponder()

}
The wait is going to be over! Just one more step and we are done.
- The final step involves creating an extension for the “UITextField” that allows you to return to the login screen after inputting the text in each Text Field. Just press the “Return” key and the Text Field will accept the entered text. Follow the code snippet written below for the same:
1
2
3
4
5
6
7
8
9
10
11
extension ViewController : UITextFieldDelegate

{

func textFieldShouldReturn(_ textField: UITextField) -> Bool {

textField.resignFirstResponder()

return true

}
The complete implementation to create a login screen using TextInputLayout in iOS app development is as follows:
1
2
3
4
5
6
7
8
9
10
11
12
13
14
15
16
17
18
19
20
21
22
23
24
25
26
27
28
29
30
31
32
33
34
35
36
37
38
39
40
41
42
43
44
45
46
47
48
49
50
51
52
53
54
55
56
57
58
59
60
import UIKit

class ViewController: UIViewController

{

@IBOutlet weak var userNameField: UITextField!

@IBOutlet weak var emailAddressField: UITextField!

@IBOutlet weak var ageField: UITextField!
@IBOutlet weak var countryField: UITextField!

override func viewDidLoad()
{
super.viewDidLoad()

userNameField.delegate = self

emailAddressField.delegate = self

ageField.delegate = self

countryField.delegate = self

}

override func didReceiveMemoryWarning()
{
super.didReceiveMemoryWarning()

// Dispose of any resources that can be recreated.

}

@IBAction func enterTapped(_ sender: Any)

{

}

override func touchesBegan(_ touches: Set, with event: UIEvent?)

{
ageField.resignFirstResponder()

}

}

extension ViewController : UITextFieldDelegate

{
func textFieldShouldReturn(_ textField: UITextField) -> Bool
{
textField.resignFirstResponder()

return true
}
}
Finally! We are done.
If the on-screen keyboard does not appear on the login screen of your app, Go to the “Hardware” option on your Xcode, click on “Keyboard”, and select “Toggle Software Keyboard”. And the keyboard will appear on the login screen.
Also Read:-Is Your Organization Ready For DevOps?

After building the project successfully, the login screen of your app will look like this:

You may also use validations for the created text fields such as email validation, which prompts the user to enter the correct email address, password validation for entering the correct password, and many more as per the requirement of your app. For example, you can use the following code snippet in order to apply email validation in iOS app development.
1
2
3
4
5
6
7
8
9
10
func isValidEmail(email: String) -> Bool
{
let emailRegEx = "[A-Z0-9a-z._%+-]+@[A-Za-z0-9.-]+\\.[A-Za-z]{2,64}"

if let emailPred = NSPredicate(format:"SELF MATCHES %@", emailRegEx)
{
return emailPred.evaluateWithObject(email)
}
return false
}
We will cover the validation part in our next blog. Stay tuned!
Conclusion
In this swift iOS app development tutorial, we have concluded that in order to achieve great conversation goals, the iOS app developers should provide a better user experience in iOS app development. A placeholder is one of the features provided by an iPhone app development company that reduces the user’s risk of stumbling while filling forms because a placeholder puts persistent instructions and hints outside the empty text fields.

4 Way Technologies is a premium IT services company that develops web, mobile, and SMART TV applications using cutting-edge technologies like React, Node.JS, Deno, Go lang, AWS, and AEM. We establish our thought leadership by sharing content and insights around technology.