How To Integrate the ‘Sign in with Apple’ Button In Your iOS App
Apple Worldwide Developer Conference (WWDC), held in June 2019, announced various new features such as ‘Dark Mode’, ‘Sign in with Apple’, and more. Many users found ‘Sign in with Apple’, one of the most advantageous features in iOS app development.
So, are you looking to integrate the new ‘Sign in with Apple’ feature in your iOS app? Then, you, as an iOS app developer, are on the right blog.
Introduction
The new ‘Sign in with Apple’ feature ensures a fast and safe way to sign in to iOS mobile apps using the Apple ID of a user. When it comes to integrating the new ‘Sign in with Apple’ feature in your iOS app, you must use the ‘Authentication Services’ framework provided by the iPhone app development company to support iOS mobile apps in native iOS app development.
This iOS app tutorial will guide beginner iOS app developers step by step in integrating the ‘Sign in with Apple’ feature in an iOS app.
So, let’s start by first understanding the purpose of introducing the ‘Sign in with Apple’ feature in iPhone app development.
What is ‘Sign in with Apple’?
‘Sign in with Apple’ is a private and faster way to sign in to your iOS apps. This feature requires the user to sign in whenever a third-party login is required such as on, Facebook, Snapchat, Instagram, or any other.
It is a trustworthy, convenient, and more consistent way to sign in to several iOS apps without having to remember enormous accounts and passwords. In order to use the ‘Sign in with Apple’ feature, you need to create an account and fill in all the required details such as name, verifiable standard identifiers, and email address.
Now, next, wewill cover the step-by-step process of integrating the ‘Sign in with Apple’ feature in an iOS app.
How To Integrate The New ‘Sign in with Apple’ Button In An iOS App
Follow the below steps to run your project in Xcode.
1. Initiate Project
- First of all, let us create a new project in Xcode.
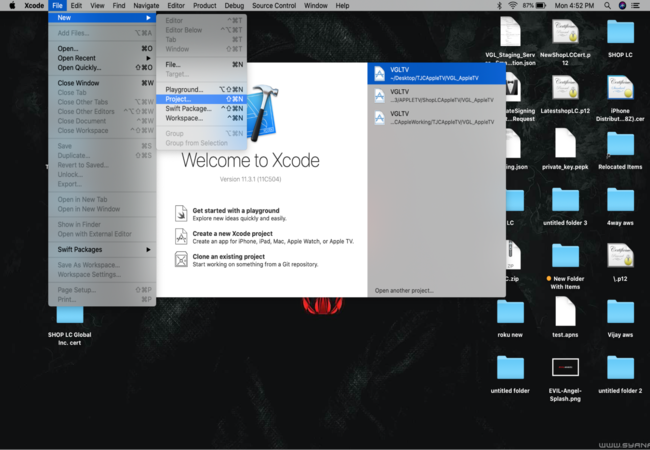
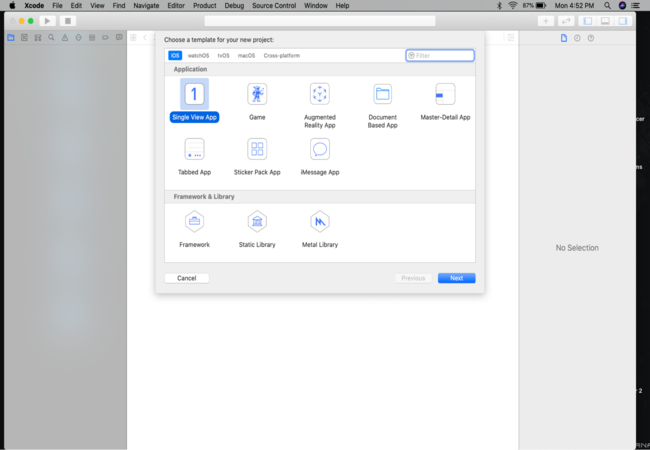
- Go to “Target” and in the “Signing & Capabilities” tab, click on “Capability” in order to add the ‘Sign in with Apple’ capability to your project.

2. Add The Apple Login Button To Your Project.
In your project, go to the “ViewController.swift ” in order to import the Authentication Services framework to infuse the new ‘Sign in with Apple’ in your iOS app.
import AuthenticationServices
This framework will provide the ASAuthorizationAppleIDButton, which enables you to initiate the ‘Sign in with Apple’ flow. Now, add a target for the touchUpInside after creating an instance of ASAuthorizationAppleIDButton. The below-written code will help you in adding this button to your project.
1
2
3
let authorizationButton = ASAuthorizationAppleIDButton()
authorizationButton.addTarget(self, action: #selector(handleLogInWithAppleIDButtonPress), for: .touchUpInside)
loginProviderStackView.addArrangedSubview(authorizationButton)
Also Read:-Best Android Libraries To Use In 2022
3. Handling Login Button Press
Now, in this step, we must use a provider instance (ASAuthorizationAppleIDProvider) on pressing the ‘Sign in with Apple’ button in order to generate a request by using the request instance (ASAuthorizationAppleIDRequest). We use this request instance to initialize a controller (AS AUthorization Apple Controller) that is responsible for performing the request. There are several ASAuthorization.Scope values available in requestedScopes array. You can use more than one value in order to request the contact information from the user of the app. The below-written code is the implementation of handleLogInWithAppleIDButtonPress.
1
2
3
4
5
6
7
8
9
10
@objc private func handleLogInWithAppleIDButtonPress() {
let appleIDProvider = ASAuthorizationAppleIDProvider()
let request = appleIDProvider.createRequest()
request.requestedScopes = [.fullName, .email]

let authorizationController = ASAuthorizationController(authorizationRequests: [request])
authorizationController.delegate = self
authorizationController.presentationContextProvider = self
authorizationController.performRequests()
}
4. Check For The Existing Account Setup
Important! Sometimes you may find that the user is already logged in with your mobile app. In that case, you must use both the providers; ASAuthorizationAppleIDProvider and ASAuthorizationPasswordProvider in order to create a request followed by the ASAuthorizationController.
- ASAuthorizationAppleIDProvider: It is used to create requests in order to authenticate the users depending on their Apple IDs.
- ASAuthorizationPasswordProvider: It is used to create requests for performing keychain credential sharing.
The below-written code is used for checking the existing account.
1
2
3
4
5
6
7
8
9
private func performExistingAccountSetupFlows() {
let requests = [ASAuthorizationAppleIDProvider().createRequest(),
ASAuthorizationPasswordProvider().createRequest()]

let authorizationController = ASAuthorizationController(authorizationRequests: requests)
authorizationController.delegate = self
authorizationController.presentationContextProvider = self
authorizationController.performRequests()
}
In the above code snippet, the function ‘performExistingAccountSetupFlows()’ is responsible for preparing requests for both the password providers and Apple ID. And the function ‘ASAuthorizationController(authorizationRequests: requests)’ is responsible for creating an authorization controller depending on the given requests.
5. Handling The ASAuthorizationController Delegate and Presentation Context
After implementing the above code successfully, the ASAuthorizationController delegate receives an authorization, which contains a credential that has a unique user identifier. You can write the credential instance as ASAuthorizationAppleIDCredential.
5.1 ASAuthorizationController Delegate
- The function ‘authorizationController(controller: didCompleteWithError:)’ is responsible for telling the delegate about the failed authorization, and providing an error to explain the reason. The code for the implementation of this function is as follows:
1
2
3
func authorizationController(controller: ASAuthorizationController, didCompleteWithError error: Error) {
//Handle error here
}- The function ‘authorizationController(controller: didCompleteWithAuthorization:)’ is responsible for telling the delegate about a successful authorization. The complete implementation of handling the error is given below.
1
2
3
4
5
6
7
8
9
10
11
12
13
14
15
16
17
func authorizationController(controller: ASAuthorizationController, didCompleteWithAuthorization authorization: ASAuthorization) {
if let appleIDCredential = authorization.credential as? ASAuthorizationAppleIDCredential {

let userIdentifier = appleIDCredential.user
let userFirstName = appleIDCredential.fullName?.givenName
let userLastName = appleIDCredential.fullName?.familyName
let userEmail = appleIDCredential.email


} else if let passwordCredential = authorization.credential as? ASPasswordCredential {
// Sign in using an existing iCloud Keychain credential.
let username = passwordCredential.user
let password = passwordCredential.password


}
}
5.2 ASAuthorizationController Presentation Context
You will also require a function ‘presentationAnchor(controller:)’ in order to tell the delegate about the window from which this function should present the content to the user. The iPhone app developers must require the following code in order to initialize this function.
1
2
3
func presentationAnchor(for controller: ASAuthorizationController) -> ASPresentationAnchor {
return self.view.window!
}
6. Enabling ‘Sign in with Apple’ In Your Apple Developer Account
While trying to sign in, you must enable the ‘Sign in with Apple’ feature in your Apple developer account in order to avoid an error message ‘AUTH_ALERT_SIGN_UP_NOT_COMPLETED’. For that, you need to create a key and we will help you step by step in generating the Auth key.
- Go to the Apple developer account and log in with your Apple ID and password.
- Then, go to the “Certificates, Identifiers & Profile” section.
- Click on “Keys” and then on the “Create a Key” option.
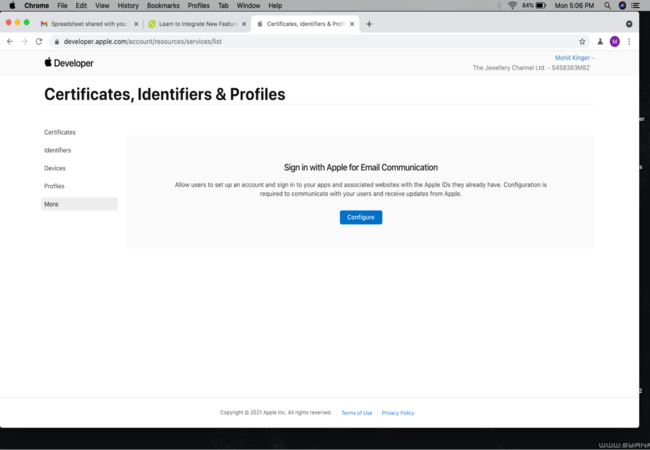
- Now, Enter the name of the key.
- In the last step, you will enable the ‘Sign in with Apple’ option.
7. Resetting An Existing Account
The following steps will help you in resetting an existing account for testing the first sign-in experience.
- Go to the ‘Settings’ app on your iPhone.
- Find the Apple ID header and tap your account in it.
- Click on “Password & Security”.
- Under the “Applications”, find your app using your Apple ID.
- And the final step is to swipe the app to delete.
After following the above-mentioned steps, you can easily reset the existing account.
Ease up! Just one more step and we are done.
8. Credential State Checking
The object ASAuthorizationAppleIDCredential provides you with the userIdentifier in order to check the credential state of a user. You can obtain the credential state for a userIdentifier by calling the function “getCredentialState(forUserID: completion:)”. The complete implementation looks like this:
1
2
3
4
5
6
7
8
9
10
11
12
13
14
15
16
let appleIDProvider = ASAuthorizationAppleIDProvider()
appleIDProvider.getCredentialState(forUserID: userIdentifier) { (credentialState, error) in
switch credentialState {
case .authorized:
// The Apple ID credential is valid. Show Home UI Here
break
case .revoked:
// The Apple ID credential is revoked. Show SignIn UI Here.
break
case .notFound:
// No credential was found. Show SignIn UI Here.
break
default:
break
}
}
Thankfully! It’s done.
Now, let us understand some benefits and guidelines of the new ‘Sign in with Apple’ feature.
What Are The Benefits Of ‘Sign in with Apple’?
- Privacy
‘Sign in with Apple’ is one of the most secure features offered by the iPhone mobile app development company, Apple. This feature allows you to log in to the third-party web or mobile apps with more privacy, which includes, hiding your email address, and more.
- Security
With ‘Sign in with Apple’, every account is protected with two-factor authentication. You can set up this authentication service by adding your Face ID or Touch ID as another layer of protection after the combination of username & password.
- Multiple Platforms
Along with native iOS app development, you can also deploy the ‘Sign in with Apple’ feature on websites and apps running on other platforms. In this case, users are sent to the ‘web view’ of the app, where they have to enter their Apple ID and password after clicking on ‘Sign in with Apple’ in order to sign in.
- Non-Repetitive Logins
The ‘Sign in with Apple’ feature alerts the users and asks for logging in to the app with the existing email instead if they already have an existing account with the app.
What Are The Guidelines To Use ‘Sign in with Apple’ Feature In Your iOS App?
If your app uses a third-party login service in order to authenticate your primary account, the app must provide ‘Sign in with Apple’ as an option.
You do not require the ‘Sign in with Apple’ feature if:
- The app uses the sign-in setups and your own account of your company.
- The app is an education, enterprise, or business app that uses an existing education or enterprise account.
- The app authenticates the users using industry or government-backed citizen identification.
Also Read:-Modern Rules for Better Mobile App Development
Conclusion
In this iOS app development tutorial, you will be able to integrate the ‘Sign in with Apple’ login feature on an iOS app. We always want to help iOS app developers, flourishing in iPhone app development with newer and updated technologies. And we hope you also found this tutorial worthwhile. Let me know your feedback in the comments below.

4 Way Technologies is a premium IT services company that develops web, mobile, and SMART TV applications using cutting-edge technologies like React, Node.JS, Deno, Go lang, AWS, and AEM. We establish our thought leadership by sharing content and insights around technology.