How to Integrate Twitter REST API in Swift to Make Seamless Interaction With Twitter

Sign in with Twitter, often known as Login with Twitter, is a button on your iOS mobile app that allows the users of Twitter to harness the advantages of a registered Twitter account in just one click.
The application developer platform provided by Twitter allows an iPhone app developer to make use of Twitter’s global, real-time, and open communication network within the iOS app development. The Twitter kit is created in order to make the interaction with Twitter more smooth and efficient.
This blog will guide you step by step in order to integrate the Twitter REST API in your iOS app development using ‘Swift’ programming language to make seamless and efficient interaction with Twitter.
Introduction
The Twitter kit offers you, as an iOS app developer, a lot of tools, application programming interface (API) products, resources, and data in order to expand and integrate the impact of Twitter through various solutions, research, and more.
There are various Twitter APIs that can be used in iPhone app development for integration into an iOS app like REST API, JSON API, and more. This iPhone app development tutorial will help you in the integration process of Twitter REST API in an iOS mobile app.
So, let’s start!
What is Twitter API?
The Twitter API includes a defined set of programmatic endpoints, which is used to engage with the conversation and communication on Twitter. This API also allows an iOS app developer to find & retrieve, or create a number of resources, such as :
- Tweets
- Direct Messages
- Media
- Lists
- Trends
- Places
With the Twitter REST API, you will be able to log in to any of the iOS apps using the “Login with Twitter” button. This API includes the endpoints that can be used for analyzing, publishing, and engaging with Twitter.
How to Integrate Twitter REST API in the iOS Mobile App
The steps required for integrating the Twitter REST API in the iPhone app development are as follows.
1. Installing Fabric App on your Mac
The first step for Twitter REST API integration into an iOS app is to install the Fabric.app on your mac. For that, you need to follow the below steps:
- Sign-up/Login to https://fabric.io/ in order to download the fabric app for the macOS.
- Unzip the downloaded “Fabric-latest.zip” file and move the Fabric.app to the applications of your mac.
- Now, open the fabric.app and enter your credentials to sign in.

2. Creating a New Project in the Xcode
In this step, there is a need to create a new project in the Xcode by following the below steps:
- Open the Xcode in your mac and select, Create a new Xcode project.

- Now, select ‘Single View App’ in the iOS tab.
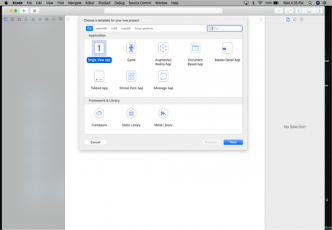
- Great! Now, you need to enter the desired ‘Product Name’, choose ‘Swift’ as the programming language, and hit ‘Next’.
- Now, save the file on the hard disk of your mac.
3. Create Pod File By Installing CocoaPods
The following steps will help you in creating the pod file, in which we will infuse the Twitter kit in order to follow the Twitter REST API integration process in the iOS app development.
- Open the ‘Terminal’ in your mac in order to install the CocoaPods.
- Next, enter the following commands:
$ sugo gem install cocoapods.
$ pod setup –verbose
$ cd ~path/to/projectDirectory
$ pod init – It creates a ‘podfile’ into the directory of the project.
$ open -a Xcode Podfile – It will open the podfile with Xcode.
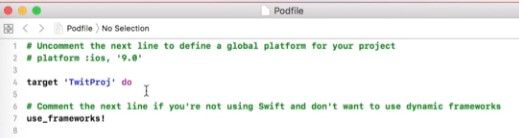
- Now, add pod ‘Fabric’ and pod ‘TwitterKit’ to the created podfile.
- Save and close the podfile. The created podfile will look like the image shown below.
- Now, add the command ‘$ pod install’ in the ‘Terminal’ in order to create “TwitterKit.xcworkspace” in the directory of the project.
Now, close the ‘TwitterKit’ Xcode project and open the “TwitterKit.xcworkspace”.
Thankfully! We have successfully integrated the downloaded podfile with the “TwitterKit.xcworkspace”.
Thankfully! We have successfully integrated the downloaded podfile with the “TwitterKit.xcworkspace”.

The following steps will help you in adding the Twitter app to Fabric.
- Open the fabric app.
- Click the button ‘+New App’.
- Now, select the file ‘TwitterKit.xcworkspace’ and hit ‘Next’.
- Next, enter the name of your organization and click ‘Next’.
- Select and install the Twitter app and click on the ‘Next’ button.

- Now, choose the podfile option and add the run script to your project.
That’s great!
- Press [cmd + B] on your mac in order to build the project in Xcode.
5. Initializing the Code
- In the “AppDelegate.swift” section of your Xcode, initialize two import statements.
- import Fabric
- import TwitterKit
After initializing these import statements, add the following code snippet under the application (_:didFinishLaunchingWithOptions) method.
1
2
3
4
5
6
7
8
9
10
11
12
import UIKit
import Fabric
import TwitterKit

@UIApplicationMain
class AppDelegate: UIResponder, UIApplicationDelegate
{
var window: UIWindow?

Func application(_ application: UIApplication, didFinishLaunchingWithOptions launchOptions:
[UIApplicationLaunchOptionsKey: Any]?) -> Bool
{
// Override point for customization after application launch.
1
2
3
4
Fabric.with( [Twitter.self] )

return true
}
- After implementing the above code snippet in the Appdelegate.swift, press [cmd + R] in order to run the application.
- Now, click on the “Done” button.

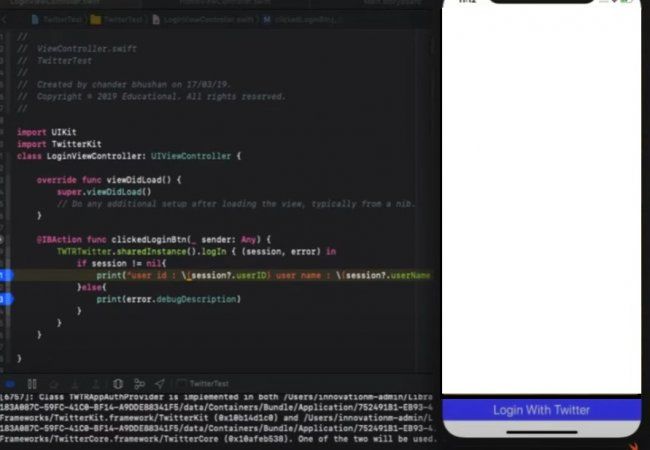
6. Adding Code in “ViewController.swift”
This step involves adding some import statements and code snippets in the “ViewController.swift” tab of your Xcode project.
Under the “viewDidLoad()” method, add the import statement import TwitterKit and the following code snippet.
//This code snippet will implement the Login button setup in your iOS app.
1
2
3
4
5
6
7
8
9
10
11
12
13
14
15
16
17
18
19
20
21
22
let logInButton = TWTRLogInButton

{

(session, error) in

guard let unwrappedSession = session else {//early return if error
print("Login error: %@", error!.localizedDescription);
return

}

let alert = UIAlertController(title: "Logged In",
message: "User \(unwrappedSession.userName) has logged in",
preferredStyle: UIAlertControllerStyle.alert
)
alert.addAction(UIAlertAction(title: "OK", style: UIAlertActionStyle.default, handler: nil))
self.present(alert, animated: true, completion: nil)

}
logInButton.center = CGPoint(x: self.view.center.x, y: 25 + logInButton.frame.size.height)
self.view.addSubview(logInButton)
// This code snippet is used for composing the tweet button setup
1
2
3
4
5
6
7
8
9
10
11
12
13
14
15
16
17
18
19
20
21
22
23
24
25
26
27
28
29
30
31
let button = UIButton(type: .system)
button.setTitle("Compose tweet", for: [])
button.sizeToFit()
button.center = view.center
button.addTarget(self, action: #selector(compose), for: [.touchUpInside])
view.addSubview(button)

After adding this code, add a function func compose() in the “ViewController.swift”

func compose()
{
// Swift
let composer = TWTRComposer()
composer.setText("just setting up my Fabric")
//you can also set the image here [composet.setImage()]
//you can also set the URL here [composet.setURL()]

composer.show(from: self)
{
result in
if (result == TWTRComposerResult.cancelled)
{
print("Tweet composition cancelled")
}
else
{
print("Sending tweet!")
}
}
}
Finally! We are done.
The final code snippet of our project will look like this.
1
2
3
4
5
6
7
8
9
10
11
12
13
14
15
16
17
18
19
20
21
22
23
24
25
26
27
28
29
30
31
32
33
34
35
36
37
38
39
40
41
42
43
44
45
46
47
48
49
50
51
52
53
let logInButton = TWTRLogInButton

{

(session, error) in

guard let unwrappedSession = session else {//early return if error
print("Login error: %@", error!.localizedDescription);
return

}

let alert = UIAlertController(title: "Logged In",
message: "User \(unwrappedSession.userName) has logged in",
preferredStyle: UIAlertControllerStyle.alert
)
alert.addAction(UIAlertAction(title: "OK", style: UIAlertActionStyle.default, handler: nil))
self.present(alert, animated: true, completion: nil)

}
logInButton.center = CGPoint(x: self.view.center.x, y: 25 + logInButton.frame.size.height)
self.view.addSubview(logInButton)

let button = UIButton(type: .system)
button.setTitle("Compose tweet", for: [])
button.sizeToFit()
button.center = view.center
button.addTarget(self, action: #selector(compose), for: [.touchUpInside])
view.addSubview(button)

After adding this code, add a function func compose() in the “ViewController.swift”

func compose()
{
// Swift
let composer = TWTRComposer()
composer.setText("just setting up my Fabric")
//you can also set the image here [composet.setImage()]
//you can also set the URL here [composet.setURL()]

composer.show(from: self)
{
result in
if (result == TWTRComposerResult.cancelled)
{
print("Tweet composition cancelled")
}
else
{
print("Sending tweet!")
}
}
}
Now, you just need to run the app.
- Now, you just need to tap on the “Login With Twitter” button in order to follow the Twitter login flow.

Now, an alert with your username will appear on the
screen. Click on “OK” to continue.
After the successful sign-in to your simulator Twitter app, you can also compose a tweet inside the text box displaying in front of you.
Click on “Tweet”.

Cheers! You have posted the tweet successfully.
What are the Features of “Login With Twitter” Button?
“Login With Twitter” button offers several impeccable features to the iPhone app developers. Some of them are as follows:
- The “Login With Twitter” button allows your site’s new visitors to log in for the first time by clicking only two buttons. Therefore, this button provides ease of use.
- “Login With Twitter” button also grants the iOS app developers authorization to use the Twitter APIs on the behalf of their users.
- A number of example code and client libraries are compatible with the “Login With Twitter” API.
Conclusion
In this iPhone app development tutorial, we have understood that integrating the Twitter REST API in an iOS app allows the users of the app to directly tweet or publish media from the mobile app. We hope this tutorial will help you. However, you can also hire an iOS app development company for implementing the REST API for your iOS mobile app.

4 Way Technologies is a premium IT services company that develops web, mobile, and SMART TV applications using cutting-edge technologies like React, Node.JS, Deno, Go lang, AWS, and AEM. We establish our thought leadership by sharing content and insights around technology.