Building Immersive Mode in the react native app
Letting your user experience the full-screen mode can allow them to focus completely on the product. Enabling Immersive mode is the best way to stop distractions coming from the status bar. With this mode, you can also hide the navigation bar and enjoy the full-screen view. This lets you increase user engagement with the app or product. Every React Native app has an immersive mode that you can activate to get the best experience of the app content.
Before starting with the app-building process, You need to get a fair knowledge about two content. One is “How to set up the React Native Development Environment” and the other one is “How to create and run react native app on the android phone”. These are two concepts that you should get prior knowledge of.
Third-party package used: react-native-android-immersive-mode
As we are focused on adding a definite feature ‘Immersive mode’ in our app, we have to be specific about the third-party npm library that we will be using. Hire React Native developers and you can find other third-party packages stored as dependencies in the package.json folder. However, you particularly need react-native-android-immersive-mode to toggle the immersive mode off or on.
Consider the following syntax from the current project.
1
2
3
4
import {
  immersiveModeOn,
  immersiveModeOff,
} from 'react-native-android-immersive-mode';
By adding the lines in your code editor, you can hide both the navigation bar and status bar. Also, you can decide whether to enable the Immersive mode in your app or disable the same. This is the excellence of the React Native framework. You can reuse codes, import native components from the third-party React native library, and use it in any of your projects.
To install the package, you have to pass the command: npm install react-native-immersive-mode --save on a terminal.
Note that if you are using React Native of version less than 0.60, you have to consider the auto-linking conduct for this library. In that case, you have to pass the command react-native link react-native-immersive-mode. Since I am using react native of version 0.68.1, I have not used the auto-linking process.
Now let’s start with the code base.
Codebase in the ImmersiveMode.js folder
Firstly, you have to create a new folder called Component where you will store the codebase of ImmersiveMode.js. Later in the app.js folder, we will be calling ImmersiveMode from ./components/ImmersiveMode. Let’s see how you achieve this.
1
2
3
4
5
6
import {View, Text, AppState, Button, StatusBar} from 'react-native';
import React, {useEffect, useState} from 'react';
import {
  immersiveModeOn,
  immersiveModeOff,
} from 'react-native-android-immersive-mode';- Firstly, I will introduce the required components.
- As you can notice, you have to import all the above-stated components
(View, Text, AppState, Button, StatusBar, useEffect, useState, React, immersiveModeOn, and immersiveModeOff)from the relevant React Native package. - I used both immersiveModeOff and
immersiveModeOnin my project to let users deactivate the immersive mode when they don't need it.
Later on, you have to introduce a function ImmersiveMode using the syntax .const ImmersiveMode = () => {. You can use ImmersiveMode as a component in the App.js folder. Also, you have to export this function to make sure it can be used in other files. You can find the return statement (export statement) export default ImmersiveMode; in the last line of code.
With the syntax, const [isImmersiveMode, setImmersiveMode] = useState(false); you declare a state variable called isImmersiveMode and set its current value to false.
Further, with the below-given syntax
1
2
3
4
5
6
useEffect(() => {
    if (isImmersiveMode) {
      immersiveModeOn();
    } else {
      immersiveModeOff();
    }
You can change the value of isImmersiveMode to either true or false. I used the if/else statement wrapped under the useEffect hook. This is to specify whether isImmersive will be on or off.
With the below-given syntax,
1
2
3
4
5
6
7
<View style={{flex: 1, justifyContent: 'center', alignItems: 'center'}}>
      <StatusBar backgroundColor={'red'} />
      <Button
        onPress={() => setImmersiveMode(!isImmersiveMode)}
        title="Toggle ImmersiveMode"
      />
    </View>
You use a View component to render a view. It has some properties, like flex, justifyContent and alignItems. Then using the syntax, <StatusBar backgroundColor={'red'} /> you set the background color of the StatusBar as red.
You integrate a Button component with an onPress prop which users can click to set the ImmersiveMode on or off. Here, with onPress prop, you execute an arrow function setImmersiveMode when you press the button.
The ‘!’ before isImmersiveMode is a logical operator. It negates the value of its operand. If it's true, then it becomes false, and vice versa.
Lastly, the clickable button has a title “Toggle ImmersiveMode'' on it.
Now we will see how you can use the ImmersiveMode function as a component in the app.js folder.
Integrating the ImmersiveMode function in App.js
Find the entire code base of the app.js folder in the GitHub repository. Let’s get into its detailed explanation.
Firstly, you have to import the basic React Native components. Refer to the following syntax.
1
2
3
import {View, Text, StyleSheet} from 'react-native';
import React from 'react';
import ImmersiveMode from './components/ImmersiveMode';
The most important component is the ImmersiveMode you have to import it from the created ImmersiveMode.js folder located in your root directory.
Moving forward, you have to return the component ImmersiveMode using the syntax
1
2
3
 {
  return <ImmersiveMode />;
};
Before using the syntax: return <../>, you have to introduce an App component. Later in the code line, you need to export the same component using the syntax: export default App;
This way you can access this component from other files.
Now it's time to run the emulator and see whether the feature is working or not.
Starting the virtual device to check the Immersive Mode feature
- Open a command prompt and pass
npm install.It is for installing the needed dependencies. - Next, you have to pass
npx react-native run-androidto activate the emulator. - After it is successfully built, you will get the screen as shown in image 1.
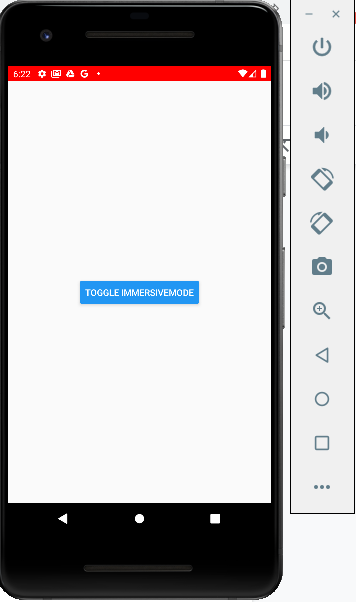
Image 1
- Once you click on the button “TOGGLE IMMERSIVEMODE”, it will hide the red Status Bar from the top and the black navigation bar from the bottom. Refer to image 2.
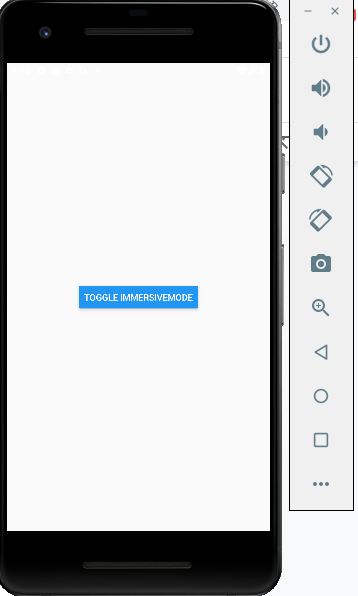
Image 2
And now you are done, giving your user the full-screen experience.
Final notes
Adding features to an app may seem to be difficult but proper knowledge about the React Native components and the process to import them from other files is important. This is what I have done in this blog. I have created a separate file for the ImmersiveMode under the component folder and imported the same ImmersiveMode component in the app.js folder. This has made my codebase much smaller and easier.
Get your hands on this codebase and build different features in your React Native app.

A science graduate who has a keen interest to lean about new technologies and research area. With an experience in the field of data analytics and content writing, she aims to share her knowledge among passionate tech readers.