Accessing Geolocation through React Native app

Geolocation functionality in an app is a significant asset to the users. It helps you to identify your location and also share the same with others. This feature can also be useful in supply chain and logistics business operations while tracking the products. Now the use of geolocation features is expanding. You must have seen Whatsapp and other social media messengers have in-built geolocation features to let users share their location with other app users. Thus, I have brought a new tutorial blog to explain how you can use React Native framework to add the feature of Geolocation in your React Native app development services.
Before starting with the explanation of React Native components, props, states, and hooks that have been used in the code snippets, let’s learn what are the third-party library users and other important prerequisites criteria.
Prior criteria to be achieved
- To build a React Native app and add functionalities to it, you should definitely set your development system with all the required installations. Since I am using React Native CLI to build the Geolocation interface within the app, you should check the React Native CLI section of the article to get detailed steps on how to set up your development environment. For this, you have to install Android Studio, JDK, React Native CLI tool, node.js, and emulator or virtual device.
- You should also know the difference between React Native CLI and Expo CLI to find out why I have used React Native CLI and not Expo CLI to build this project. Check this article to get a clear concept of the difference between the two React Native development tools.
- Get a basic idea of building a React Native app using React Native CLI. Visit the link for developing your basic React Native app.
Considered third-party plugin
Even though you will find different dependencies installed in the package.json folder of the app, @react-native-community/geolocation is the most critical third-party React Native library used for importing the Geolocation component in my app.
To get started with this package, you need to run the command npm install @react-native-community/geolocation --save in your project terminal.
As we are done with the vital theoretical discussion, let’s now start with the explanation of code syntax. You can also find the entire codebase in the App.js folder of the app in the GitHub repository.
Interpretation of code syntax
1
2
3
import {StyleSheet, Text, View} from 'react-native';;
import React, {useState} from 'react';;
import Geolocation from '@react-native-community/geolocation';- With the above code syntax, I imported all the required components.
- Firstly, I imported styleSheet, Text, and View components from react-native.
- Secondly, I imported React and useState modules from react.
- Lastly, you need to import the Geolocation component from the third-party React Native library @react-native-community/geolocation.
navigator.geolocation =
require('@react-native-community/geolocation');
- It is a global object that will allow you to access the geolocation of devices.
- You can get the updated location of the device.
const App = () => {
const [location, setLocation] = useState();;
- The useState() hook is used to get state variables in functional components.
- The syntax const [location] specifies a variable location. It will hold the data that will be obtained from the geolocation API.
- The second part setLocation() is used to update state variables. Here, it will update your location variable with new longitude and latitude values whenever they are available.
1
2
3
 Geolocation.getCurrentPosition(
    position => {
const initialPosition = position;- Here, the syntax
Geolocation.getCurrentPosition(...)is used to get the current position of the device. - The syntax
const initialPosition = position;generates a variable initialPosition which will hold the value of the position. This will further allow you to get properties on it in the later part of the codebase. Here, it will be longitude and latitude.
console.log(initialPosition.coords.latitude);
setLocation(initialPosition.coords);
},
- Console.log() function is used to print the latitude of the device’s location.
- initialPosition.coords is an object which comprises two properties: longitude and latitude
error => Alert.alert('Error', JSON.stringify(error)),
- It is a function that renders the error message in case the user denies access to their location.
{enableHighAccuracy: true, timeout: 20000, maximumAge: 1000},
);
- It is an object which has two properties:
timeOutandenableHighAccuracyandmaximumAge.
return (
<View style={styles.container}>
- It is a function that will return JSX and is the key component of this project or app.
<Text style={styles.textLocation}>Geolocation</Text>
- Here, the Text component is used to display the text ‘Geolocation’ with some styling objects.
- The style object is the
styles.textLocation.
<View style={styles.box}>
- The View component is used to display the latitude and longitude of the device’s location.
style={styles.box} used is a property that will allow you to style the box holding latitude and longitude in it.
1
2
3
4
5
6
<Text style={styles.text}>

          latitude:-{location && location.latitude}
        </Text>
        <Text style={styles.text}>
longitude:-{location && location.longitude}- Call it a ternary operator. It is a simpler way of writing if or else conditional statements.
- Here, it has been useful for checking whether the value of the position is correct or not. In case it is true, it will return the location of latitude and longitude respectively. If it is false, It will return undefined.
- It uses the && logical operator.
1
2
3
4
5
6
7
8
9
  </Text>
      </View>
    </View>
  );
};

export default App;

const styles = StyleSheet.create({- Here. I used a constant variable to hold the value of the StyleSheet.create() function.
1
2
3
4
 container: {
    flex: 1,
    backgroundColor: 'orange',
},- It defines the flex and background color of the container which holds the latitude and longitude value of the device.
1
2
3
4
5
6
7
8
9
10
11
12
13
14
15
16
17
18
 textLocation: {
    fontSize: 30,
    marginHorizontal: 100,
    marginTop: 300,
  },
It defines the font size, horizontal margin, and top margin of the textLocation component.
  box: {
    width: 300,
    height: 80,
    backgroundColor: 'white',
    alignSelf: 'center',
    marginTop: 20,
    shadowColor: '#171717',
    shadowOffset: {width: -2, height: 4},
    shadowOpacity: 0.2,
    shadowRadius: 3,
    elevation: 20,
},- It styles the box component. It contains the width, height, background color, self-alignment, top margin, shadow color, shadow offset, shadow opacity, the shadow of the radius, and elevation of the box component.
1
2
3
4
5
6
 text: {
    color: '#000000',
    fontSize: 15,
    marginHorizontal: 20,
  },
})- Lastly, it is a style object which styles the text component with definite color, font size, and horizontal margin.
Running the Geolocation app on the emulator
- Run the command
npm installto install the needed packages. For this, first, open the terminal from your code editor. - Run the command
npx react-native run-androidon the same terminal after the packages have been installed. It will open the emulator on your development system. - Wait until the bundling on the emulator is done.
- You will be directed to a screen on the emulator similar to image 1.

Image 1
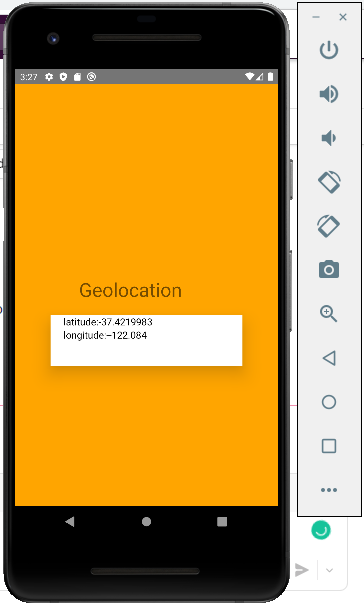
Click on the button showing “Allow only while using the app” and you will get a screen as shown in image 2. You can see the position (latitude and longitude) of your device.

Image 2
Final thoughts
Get your hands on making a geolocation app using React Native framework. It has much less coding compared to other frameworks. But what you need to do is to understand the use of different components, hooks, arguments, and styling objects of React Native. Here, in this tutorial blog, I attempted to bridge this gap and make it more insightful in the sense that you can customize the app as per your preference.

A science graduate who has a keen interest to lean about new technologies and research area. With an experience in the field of data analytics and content writing, she aims to share her knowledge among passionate tech readers.