Building a React Native Expo App for Video Recording

Hope you are doing well, React Native app developers!
Do you know that watching videos on mobile phones is acquiring popularity in U.S.? It is due to high-speed internet access. As per the report of March 2022, more than 60% of the digital video audience watched videos on mobile devices, while 56% used smart TVs. U.S. adults spend an average of over 50 minutes daily on video content surfacing on mobile devices.
Given, the demand for user-friendly video recording apps is more significant than ever. Thus, crafting a React Native Expo App for Video Recording is more than a technological advancement. It is a response to a cultural shift towards mobile multimedia. A professional React native app development company plays a vital role in this landscape, offering custom solutions to capture the ever-growing mobile audience.
So, are you excited to learn the approach adopted by them? Then this article is what you were looking for.
What you need to do is perform pre-requisites, code, and execute the code.
Pre-requisites to Consider
It is a short and quick section. Let’s see what you have to do.
Set up for the React-Native Development Environment
When developing with React Native framework, setting up the environment is what you need to do first. Since, we will build the current project with Expo and not with the React Native CLI, you have to set up the React Native Expo Development Environment.
Here are the software or the installations you must perform to get this thing done.
- Expo CLI
- Andriod Studio
- VS Code Editor
- Node.js
- Npm
Check the blog article ‘How to set up the React Native Development Environment’ for a detailed scenario.
Get a Project Folder Build
For this, build a new folder in your dev system like you do. After you are done with it, run the terminal from the folder. Pass a command expo init VideoRecording on the terminal. It will give your React Native Expo project a specified name ‘VideoRecording’.
Now, to navigate to the folder, you can consider the command cd YourProjectName. Here, replace YourProjectName with VideoRecording.
Installing Third-Party Library
To make our work easier, we need to get some external libraries. This is what experts of a React Native app development company do to speed up their build development and reduce production time.
So, here you need to install ‘expo-camera’ and ‘expo-av’.
The expo-camera is a module or library which allows you to access the device's camera in your Expo and React Native application. It provides several functionalities like capturing photos, recording videos, and even face detection. Refer to the official documentation for complete details and additional features available in this module.
The expo-av library or module is used in React Native and Expo apps to play and record video and audio. It provides an API to interact with multimedia and includes components like Video for playing videos and Audio for regulating sound.
So, we have successfully completed the pre-requisite section. We need to head toward the coding section and create the App.js folder.
Crafting the App.js Folder
If you are someone who only wants the source code, here it is. However, if you want to get the code explanation, follow along.
1
2
3
4
import React, { useState, useEffect } from 'react';
import { StyleSheet ,Text, View, Button, Image} from 'react-native';
import { Camera } from 'expo-camera';
import { Video } from 'expo-av';
React, useState, and useEffect are React components. ‘useState’ manages the local state, and ‘useEffect’ executes additional effects in functional components. These are performing actions when the component mounts.
StyleSheet, Text, View, Button, and Image are core components for building the user interface.
'Camera' from the 'expo-camera' is a component of the 'expo-camera' module. It is meant for the device's camera. You can capture photos or videos with it.
Video' from 'expo-av' is related to the 'expo-av' library.
1
2
3
4
5
6
7
8
export default function App() {
  const [hasAudioPermission, setHasAudioPermission] = useState(null);
  const [hasCameraPermission, setHasCameraPermission] = useState(null);
  const [camera, setCamera] = useState(null);
  const [record, setRecord] = useState(null);
  const [type, setType] = useState(Camera.Constants.Type.back);
  const video = React.useRef(null);
  const [status, setStatus] = React.useState({});
Audio and Camera Permissions: You have two state variables, 'hasAudioPermission', and 'hasCameraPermission', to track if the user has permitted you to use the microphone and camera. You're asking nicely, and these will tell you if the user said yes!
Camera and Recording States: With 'camera', you'll control the camera itself, and with 'record', you'll know if you're currently recording. Think of them as the buttons on your old camcorder!
Type of Camera: You want to know if you're using the front or back camera, right? That's what type is for. By default, it's set to the back camera.
Video and Status: The video reference helps you control video playback, and status keeps track of how the video is doing (playing, paused, etc.).
1
2
3
4
5
6
7
8
9
10
 useEffect(() => {
    (async () => {
      const cameraStatus = await Camera.requestPermissionsAsync();
      setHasCameraPermission(cameraStatus.status === 'granted');

      const audioStatus = await Camera.requestMicrophonePermissionsAsync();
      setHasAudioPermission(audioStatus.status === 'granted');

    })();
  }, []);
Consider this ‘useEffect’ hook as the control center that springs into action as soon as the app starts. It is like the security check at the entrance.
The await Camera.requestPermissionsAsync() politely asks, "May I use your camera, please?" If the user says yes, ‘setHasCameraPermission’ records that permission as 'granted'. It is the guard checking your ID before letting you in.
Next, ‘Requesting Microphone Permission’ is the microphone's turn. The await ‘Camera.requestMicrophonePermissionsAsync()’ does the same for the microphone. It's asking nicely, "Can I use your microphone?" And if the answer is yes, it records that permission too.
1
2
3
4
5
6
7
8
9
const takeVideo = async () => {
    if(camera){
        const data = await camera.recordAsync({
          maxDuration:10
        })
        setRecord(data.uri);
        console.log(data.uri);
    }
  }
First, the code checks if the camera is set up and ready to roll. If not, nothing happens. It ensures the camera lens cap is off before you start filming.
If the camera is ready, the action begins! The line 'await camera.recordAsync({ maxDuration:10 })' starts recording a video. And it's not just any video. It is a quick, 10-second clip.
Once the recording is done, 'setRecord(data.uri)' saves the video's location (or URI) to the state. It carefully places the recorded film in the right spot.
The 'console.log(data.uri)' is like the director and helps you to refer to it later. It simply prints the Video URI on the console.
1
2
3
4
5
6
7
8
9
10
11
12
13
14
15
16
17
18
19
  const stopVideo = async () => {
    camera.stopRecording();
  }

  if (hasCameraPermission === null || hasAudioPermission === null ) {
    return <View />;
  }
  if (hasCameraPermission === false || hasAudioPermission === false) {
    return <Text>No access to camera</Text>;
  }
  return (
    <View style={{ flex: 1}}>
        <View style={styles.cameraContainer}>
            <Camera
            ref={ref => setCamera(ref)}
            style={styles.fixedRatio}
            type={type}
            ratio={'4:3'} />
        </View>
The 'stopVideo' function tells the camera to stop recording. It is pressing the stop button on your video camera.
Before anything occurs, the code checks if users have permission to use the camera and microphone:
An empty view is shown if the permissions are not yet determined (null).
If either permission is denied (false), a message "No access to camera" appears on the screen. However, the code sets up the camera view if users have both permissions. The camera is placed inside two views (containers).
1
2
3
4
5
6
7
8
9
10
11
12
13
14
15
16
17
18
19
<Video
          ref={video}
          style={styles.video}
          source={{
            uri: record,
          }}
          useNativeControls
          resizeMode="contain"
          isLooping
          onPlaybackStatusUpdate={status => setStatus(() => status)}
        />
        <View style={styles.buttons}>
          <Button
            title={status.isPlaying ? 'Pause' : 'Play'}
            onPress={() =>
              status.isPlaying ? video.current.pauseAsync() : video.current.playAsync()
            }
          />
        </View>
The <Video> component sets up the area where your recorded video will play.
'ref={video}' connects the video player to the app, letting you control it.
'source={{ uri: record }}' tells the player where to find your recorded video.
'useNativeControls' gives you standard play/pause controls, like on a regular video player.
'resizeMode="contain"' ensures the video fits properly on the screen.
'isLooping' makes the video play repeatedly until you stop it.
'onPlaybackStatusUpdate' lets the app know what's happening with the video (like if it's playing or paused). Below the video, there's a <Button> that lets you play or pause the video:
If the video is playing (status.isPlaying), the button will say 'Pause', and clicking on it will pause the video.
If the video is paused, the button will say 'Play', and pressing it will play the video.
1
2
3
4
5
6
7
8
9
10
11
12
13
14
15
<Button
            title="Flip Video"
            onPress={() => {
              setType(
                type === Camera.Constants.Type.back
                  ? Camera.Constants.Type.front
                  : Camera.Constants.Type.back
              );
            }}>
          </Button>
          <Button title="Take video" onPress={() => takeVideo()} />
          <Button title="Stop Video" onPress={() => stopVideo()} />

    </View>
  );
This part of the code is the control panel for your video recording.
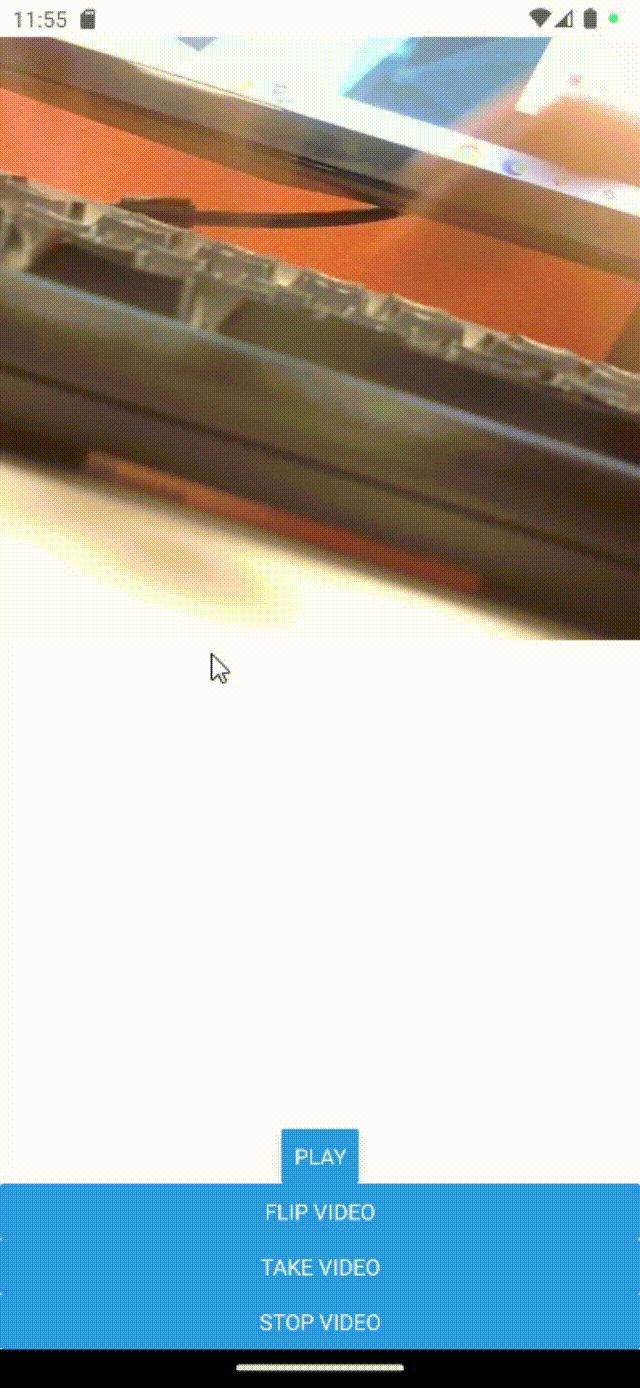
There is a 'Flip Video' Button. Pressing this button switches it between the front and back camera. It's like flipping a two-sided camera to take a video from the front or film something else.
There is a 'Take Video' Button. Clicking on it starts recording a video. It is the red record button on a regular camera.
And there is a 'Stop Video' Button. Clicking this button stops the recording.
Considering you have understood the logic behind the coding, let’s move on to the next step.
Program Execution
To check if the build is correctly created, you must run the program on the emulator. You can also run it on your Android mobile devices.
Follow the steps mentioned below.
- Go to your project folder and run the command prompt.
- Pass a command
expo start. It will start your project. - This will open a new page in your web browser with a QR code.
- Scan the code with the Expo Go app on your Android device. You can also run it on an emulator.
Here, shown below, is the output of the project.

To Conclude
Giving reality to a project is as simple as creating a picture with a jigsaw puzzle. You need to visualize the project. This principle fits well while building a video-recording app with React Native framework. Just a basic knowledge of coding will be more than enough. Even if you are not sure how to start, get a consultation with an expert from a React Native app development company.

A science graduate who has a keen interest to lean about new technologies and research area. With an experience in the field of data analytics and content writing, she aims to share her knowledge among passionate tech readers.