How to Present Content Larger Than a Single Screen Using iOS Scroll View
The iOS Scroll View feature is mainly used in order to view the content, which cannot fit in a single screen properly. You, as an iOS app developer, can find the UIScrollView as one of the most versatile and useful controls in iPhone app development.
iOS Scroll View also contains the ‘iOS Table View’, which is a subclass of UIScrollView and offers an efficient way to display the larger content in a single screen.
In this iOS app development tutorial, we will guide you step by step in order to create a sample app in our Xcode simulator to demonstrate the use of iOS Scroll View control in iPhone app development.
What is a Scroll View?
A Scroll View allows the users to scroll through the content on their iOS devices. Generally, there you can scroll in two ways:
- Vertical Scroll.
- Horizontal Scroll.
Vertical scroll mainly comes into implementation while using the mobile apps that represent the content in a list-type view such as, Email apps, Facebook, the File apps, and more.
Horizontal scroll, on the other hand, is less common but still can be found in various content apps where the Categories of the app are presented in a horizontal order. One of the best examples is IMDB, which allows the user to scroll both horizontally and vertically.
Now, let’s move further and understand how we can present the larger content in a single screen using the iOS Scroll View feature in the iPhone app development.
So, let’s start!
Creating a New Project in Xcode
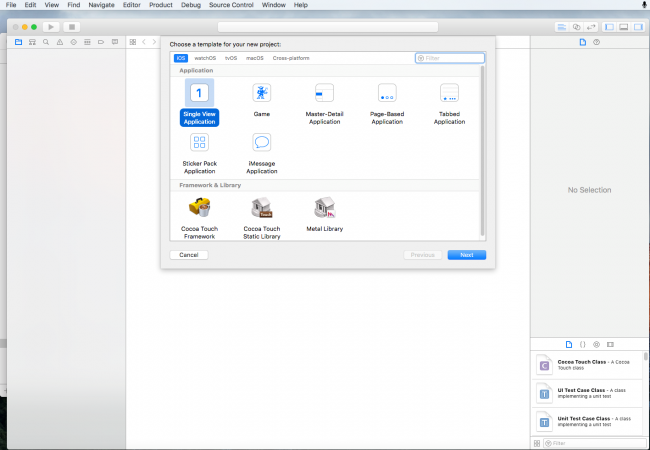
- Open the Xcode in your mac and select, Create a new Xcode project.

- Now, tap on the iOS tab and select, ‘Single View Application’.
- After this, enter the Product Name of your choice and select the programming language as Swift. Click ‘Next’.
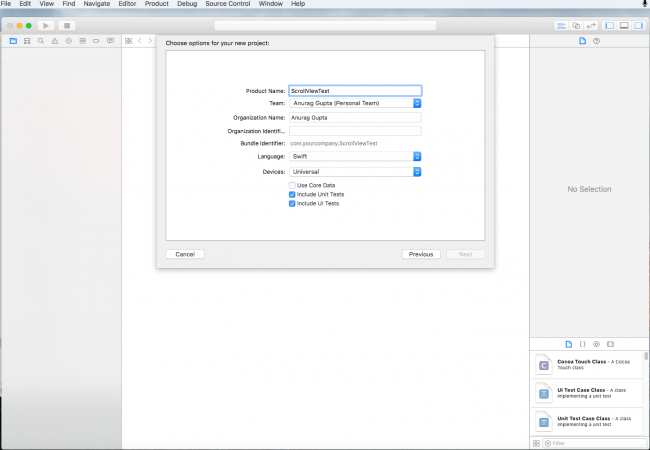
- Next, you need to save the project in the hard disk of your mac.

Great! Now, let’s understand how we can design the UI of the app in the Main Storyboard of the Xcode.
Creating the App UI in the Main Storyboard
In this step, the iOS app developers need to design the UI of the app in the Xcode that would appear on the simulator app once we build and run the project.
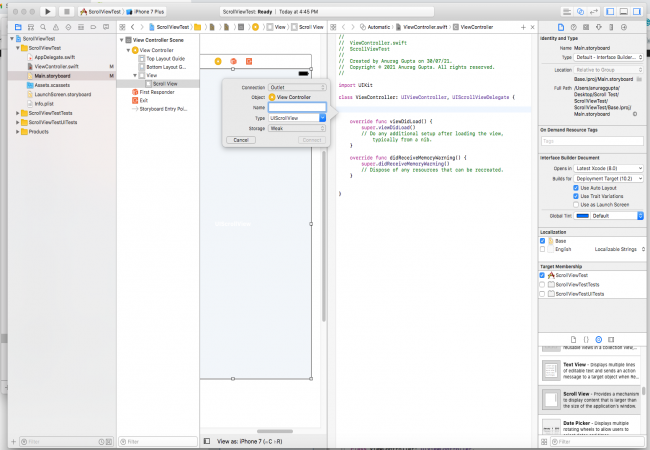
- Go to the Main Storyboard in your project and select ‘ViewController’.

- Now, go to the ‘Object Library’ section and drag & drop the UIScrollView to the ViewController.

- Important! Do not forget to add the constraints to the UIScrollView because they are responsible for aligning the created UI to the screen of the View Controller and your simulator app.

- Now, in this step of the mobile app development process, go to the ‘ViewController.swift’ in your project in order to set the outlet and delegate of the scroll view.
- Press and hold the ‘Control’ key and drag the UIScrollView from the Main Storyboard to the ViewController.swift in order to create an outlet.
Adding Image in UIScrollView and Initializing UIImageView object
Once you follow the above steps successfully, it’s time to initialize the UIImageView object in the ‘ViewController.swift’. UIScrollView also allows you to implement the addition of images in the ‘ViewController.swift’.
The following code snippet will help you in initializing the UIImageView object.
1
2
3
4
5
6
7
8
9
10
11
12
13
14
15
16
17
18
19
20
21
var imgView: UIImageView!

override func viewDidLoad()
{
super.viewDidLoad()

imgView = UIImageView(image: UIImage)
imgView.center = self.view.center
imgView.contentMode = .scaleAspectFit
imgView.frame = CGRect(x: 0, y: 0, width: self.view.frame.size.width, height: self.view.frame.size.height)

scrTest.backgroundColor = UIColor.black
scrTest.autoresizingMask = [UIView.AutoresizingMask.flexibleWidth , UIView.AutoresizingMask.flexibleHeight]
scrTest.delegate = self
scrTest.minimumZoomScale = 0.1
scrTest.maximumZoomScale = 4.0
scrTest.zoomScale = 1.0
scrTest.addSubview(imgView)

self.setupGestureRecognizer()
}
Here, the UIImageView object is used to view the initialized image in the simulator app. The function self.setupGestureRecognizer() is used to initialize any additional setup after loading the view, usually from a nib.
Adding the Delegate Method of Scroll View
Once you initialize the UIImageView successfully, it’s time to add the delegate method of ScrollView in the AppDelegate.swift, which is required in order to zoom in/out the image in ScrollView.
The code snippet for adding the delegate method of ScrollView is as follows:
1
2
3
4
5
6
7
8
9
10
11
12
13
14
15
16
17
18
19
20
21
22
23
24
25
26
27
28
29
30
31
32
33
34
35
36
37
38
39
40
41
42
43
44
45
46
47
48
49
50
51
func setupGestureRecognizer()
{
let doubleTap = UITapGestureRecognizer(target: self, action: #selector(ViewController.handleDoubleTap(recognizer:)))
doubleTap.numberOfTapsRequired = 2
scrTest.addGestureRecognizer(doubleTap)
}
@objc func handleDoubleTap(recognizer: UITapGestureRecognizer)
{
if (scrTest.zoomScale > scrTest.minimumZoomScale)
{
scrTest.setZoomScale(scrTest.minimumZoomScale, animated: true)
}
else
{
scrTest.setZoomScale(scrTest.maximumZoomScale, animated: true)
}
}
override func viewWillLayoutSubviews()
{
setZoomScale()
}
func setZoomScale()
{
let imageViewSize = imgView.bounds.size
let scrollViewSize = scrTest.bounds.size
let widthScale = scrollViewSize.width / imageViewSize.width
let heightScale = scrollViewSize.height / imageViewSize.height

scrTest.minimumZoomScale = min(widthScale, heightScale)
scrTest.zoomScale = 1.0
}
func viewForZooming(in scrollView: UIScrollView) -> UIView?
{
return imgView
}
func scrollViewDidZoom(_ scrollView: UIScrollView)
{
let imageViewSize = imgView.frame.size
let scrollViewSize = scrollView.bounds.size

let verticalPadding = imageViewSize.height < scrollViewSize.height ? (scrollViewSize.height - imageViewSize.height) / 2 : 0
let horizontalPadding = imageViewSize.width < scrollViewSize.width ? (scrollViewSize.width - imageViewSize.width) / 2 : 0

scrollView.contentInset = UIEdgeInsets(top: verticalPadding, left: horizontalPadding, bottom: verticalPadding, right: horizontalPadding)
}
override func didReceiveMemoryWarning()
{
super.didReceiveMemoryWarning()
// Dispose of any resources that can be recreated.
}
}
Here the function scrollViewDidZoom() is initialized in order to zoom in/out the image in the UIScrollView. Also, the function super.didRecieveMemoryWarning() is used to dispose of any resources that can be recreated.
Read Also:- https://4waytechnologies.com/blog/the-decline-of-pay-tv-in-america/
Setup the Final Code
The final code snippet of presenting the larger content in a single screen using iOS Scroll View in the iPhone app development is as follows:
1
2
3
4
5
6
7
8
9
10
11
12
13
14
15
16
17
18
19
20
21
22
23
24
25
26
27
28
29
30
31
32
33
34
35
36
37
38
39
40
41
42
43
44
45
46
47
48
49
50
51
52
53
54
55
56
57
58
59
60
61
62
63
64
65
66
67
68
69
70
71
72
73
var imgView: UIImageView!

override func viewDidLoad()
{
super.viewDidLoad()

imgView = UIImageView(image: UIImage)
imgView.center = self.view.center
imgView.contentMode = .scaleAspectFit
imgView.frame = CGRect(x: 0, y: 0, width: self.view.frame.size.width, height: self.view.frame.size.height)

scrTest.backgroundColor = UIColor.black
scrTest.autoresizingMask = [UIView.AutoresizingMask.flexibleWidth , UIView.AutoresizingMask.flexibleHeight]
scrTest.delegate = self
scrTest.minimumZoomScale = 0.1
scrTest.maximumZoomScale = 4.0
scrTest.zoomScale = 1.0
scrTest.addSubview(imgView)

self.setupGestureRecognizer()
}
func setupGestureRecognizer()
{
let doubleTap = UITapGestureRecognizer(target: self, action: #selector(ViewController.handleDoubleTap(recognizer:)))
doubleTap.numberOfTapsRequired = 2
scrTest.addGestureRecognizer(doubleTap)
}
@objc func handleDoubleTap(recognizer: UITapGestureRecognizer)
{
if (scrTest.zoomScale > scrTest.minimumZoomScale)
{
scrTest.setZoomScale(scrTest.minimumZoomScale, animated: true)
}
else
{
scrTest.setZoomScale(scrTest.maximumZoomScale, animated: true)
}
}
override func viewWillLayoutSubviews()
{
setZoomScale()
}
func setZoomScale()
{
let imageViewSize = imgView.bounds.size
let scrollViewSize = scrTest.bounds.size
let widthScale = scrollViewSize.width / imageViewSize.width
let heightScale = scrollViewSize.height / imageViewSize.height

scrTest.minimumZoomScale = min(widthScale, heightScale)
scrTest.zoomScale = 1.0
}
func viewForZooming(in scrollView: UIScrollView) -> UIView?
{
return imgView
}

func scrollViewDidZoom(_ scrollView: UIScrollView)
{
let imageViewSize = imgView.frame.size
let scrollViewSize = scrollView.bounds.size

let verticalPadding = imageViewSize.height < scrollViewSize.height ? (scrollViewSize.height - imageViewSize.height) / 2 : 0
let horizontalPadding = imageViewSize.width < scrollViewSize.width ? (scrollViewSize.width - imageViewSize.width) / 2 : 0

scrollView.contentInset = UIEdgeInsets(top: verticalPadding, left: horizontalPadding, bottom: verticalPadding, right: horizontalPadding)
}
override func didReceiveMemoryWarning()
{
super.didReceiveMemoryWarning()
// Dispose of any resources that can be recreated.
}
}
Breath again! We are done.
The final output of our simulator app will look like this:

Now, you can vertically scroll the image after successfully implementing all the steps involved in your mobile app development.
Read Also :- https://4waytechnologies.com/blog/a-complete-guide-to-iphone-apps-development-costs/
Conclusion
We really hope that you find this iPhone app development tutorial helpful and now you can implement the iOS Scroll View control in the iOS app. However, if you still face some issues, hire an iPhone app development company. Also, do share your feedback in the comment section.

4 Way Technologies is a premium IT services company that develops web, mobile, and SMART TV applications using cutting-edge technologies like React, Node.JS, Deno, Go lang, AWS, and AEM. We establish our thought leadership by sharing content and insights around technology.