How To Publish An App On Google Play Store?
4 Way Technologies, a leading Android app development company offers enormous Android-based app development services. The mobile app developers here are highly skilled and provide robust, scalable, and intuitive mobile applications, which are Android-centric.
When you are done with the development process of an application, there will be a requirement of submitting the application to Google Play Store in order to publicly publish your product globally. The publishing process of an app might be tricky for the first time for you.
But, there is no need to worry.
We are here to help and guide you through various steps in order to make the releasing process of your application on the Google Play Store a bit easier.
This article deals with the step by step process of publishing an Android application to the Play Store.
Introduction
Smartphones play a vital role in our day-to-day lives. This is the major reason behind many entrepreneurs and startups opting for mobile app development for almost everything. Most businesses and even retail or several other stores are using mobile apps for continuous engagement of their audiences. Which is why many individuals like you, are very anxious to launch their own mobile app.
Now, after the successful mobile app development, you might wonder, how to publish the app on the Play Store?
Well! This tutorial will help you step-wise to submit the application to the Google Play Store. This is because the Play Store is the most preferred platform in order to reach and engage a number of users.
So, let us hop in!
Also read:-Modern Rules for Better Mobile App Development
How To Submit An App To The Google Play Store?
Now, let us follow the below steps in order to publish your app on the Play Store. You must also ensure that you follow the right flow and process for hassle free and quicker publishing of the app.
STEP 1: Creating A Developer Account
In order to put an application on the Google Play Store, you must sign up for the Google Developer Account. There are four primitive steps that you need to follow for creating an account, which are as follows:
- Go to the Google Developer Console by clicking on this link.
- After this, sign up with the Google Account associated with you.
- Now, accept the agreement for developers.
- In this step, there will be a need to pay $25, which is a one time registration fee.
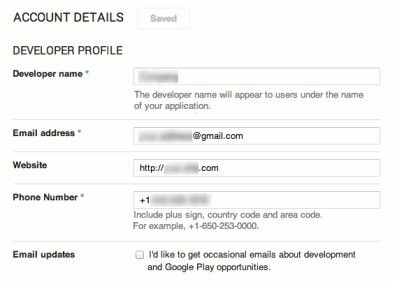
- Now, complete the entire form by filling all the credentials of your account.
STEP 2: Creating A Google Wallet Merchant and Linking it to the Developer Account
In this step, you will need a merchant account in order to receive all the payments processed by the users for in-app purchases and downloading the app.
The following steps will help you in creating a Google Wallet Merchant, which are the must-follow steps prior publishing the application on the Google Play Store:
- The first step involves logging into your Google Developer Account.
- Go to “Menu” and click “Reports”.
- After this, click on Financial Reports.
- Now, select “Set Up a Merchant Account”.
- Fill in your business credentials.
- Finally, Click on the Submit button.
After clicking on “Submit”, your developer account will be linked to the merchant account.
STEP 3: Uploading The Application On The Google Play Store
After succeeding in the developer-merchant account linking process, you will get the access to upload the app on the Play Store.
The following steps will help you in creating a new app for App Store Listing:
- Go to Menu, and click on All Applications.
- Now, select “ Add a New Application”.
- From the drop down menu, select the default language.
- After this, name your application with less than 30 characters.
Now, here you will get two options to submit your application on the Play Store. Either you can prepare Store Listing or upload the Android Package Kit (APK).
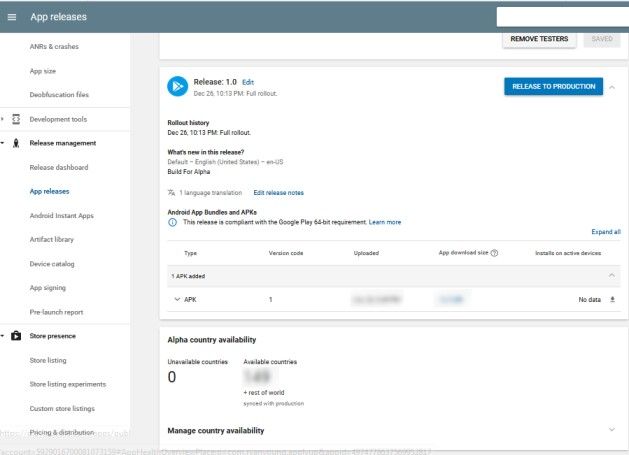
STEP 4: Uploading APK or App Bundles
APK is the short form that we use for Android Package Kit, which is an Android file format responsible for storing, distributing, and installing applications on Android mobile devices.
There are two ways of uploading the APK. You can do this either by navigating and browsing or by drag-and-drop method into the box.
Follow the below steps to upload the APK file:
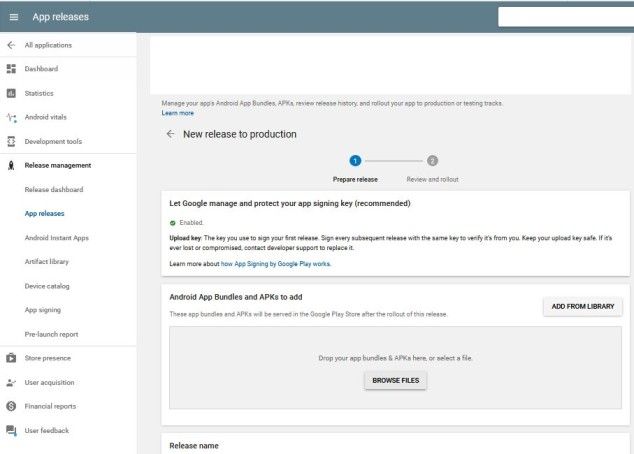
- Go to Menu, and click “Release Management”
- Click on “App Releases”
- For the first release, select the release type from a closed test, production release, internal test, or an open test.
- Now, you need to click on “Create Release“
After following these steps, you will be required to follow the on-screen instructions in order to upload the APK files.
Important! If you have created an MVP (Minimum Viable Product) app and want to test it among a limited number of users, selecting from an internal test, open test, or closed test is the preferred way. On the other hand, if you are willing to test your application among mass audiences, then choosing Product Release is the recommended way.
STEP 5: Preparing App Store Listing
In this step, you need to fill all the necessary information of your application in order to upload it on the Play Store. You can also save your form as a draft and complete it later. Also, do not forget to get in touch with your branding or marketing team for creating the perfect app profile as per the requirements of your business.
The following steps will help you in creating the appropriate app profile:
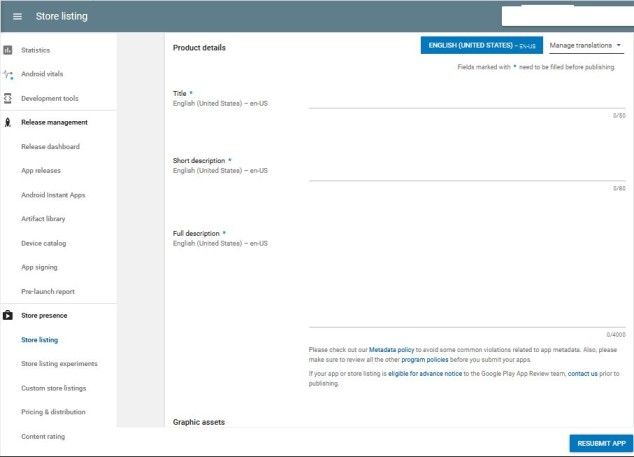
- First, add the title of your applications, which must be less than 50 characters.
- Then, add a short description for the app, which should not exceed 80 characters.
- Now, add a full description for the app within 4000 characters.
Also, do not forget to add the screenshots, videos, graphic content, icons, and images of your application.
- Add the app translations in different languages. Either you can purchase them or add your own version.
- Ensure relevant category and type for the categorization of your application.
- Add your correct contact details for quick contactability of the users. Including the email address is mandatory. However, adding your website and phone number is your choice.
From the user’s perspective, the informational detail that you will enter is responsible for creating the persona of the application. It plays an important role by helping the user in deciding if they should download the app. So, you must fill this information carefully.
STEP 6: Adding the Correct Content Rating
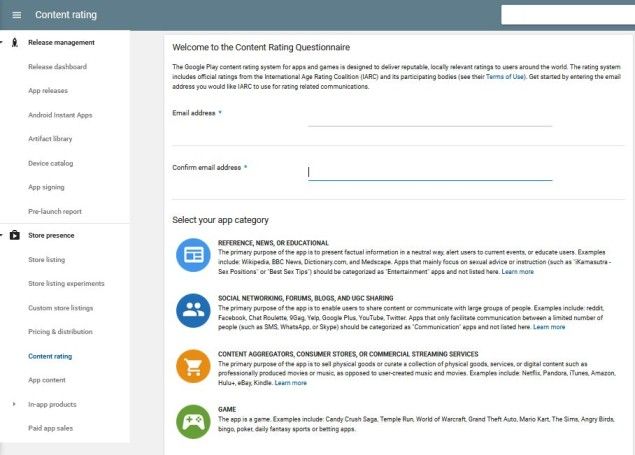
If you skip rating the content correctly, there is a high probability of getting your app removed from the Play Store. Follow the below steps to rate your content:
- Go to Google Play Console
- Now, go to Menu, and click “Store Presence”
- Now, you can rate from here.
The rating plays an impeccable role in engaging a large number of relevant users to the application. However, make sure that you provide the right rating and accurate information. This is because, providing the false rating or misguiding the users might end in getting the application removed or suspended from the Play Store.
Just a few more steps and you will be able to efficiently publish your app to the Google Play Store!
STEP 7: Selecting a Distribution and Pricing Model
Now, in this step you will get two options to publish the app. Either choose the paid version or free version of the app to be published. One thing is to make sure that Google Play Store only allows you to change the paid version of an app to the free version after publishing. Which means, if you have submitted the app with its free version, you will not be able to change its version to free after that. So, when it comes to choosing the pricing model, be careful!
Now that you have wisely selected the pricing model, let us quickly discuss the selection process of the distribution model.
Here you can either choose the preferred specific countries or choose all countries for the distribution of the application. Also, you can select specific Android devices and programs for the application.
STEP 8: Publishing the App on Google Play Store
This step primarily deals with the reviewing and cross checking of all the above processes that you have gone through. Make sure that you have not missed a single step and completed the process accurately before you finally click the “Publish Your App” button.
Here you will get the information about any missed information, errors, or any other warnings that may cause interruption in the app publishing process. Just go through and review all the necessary information carefully and wisely.
Alas! You have successfully published the app in all the selected countries.
How You Can Get An App Featured On The Play Store?
After following the above steps carefully and publishing the app on the Play Store, it is high time to think about how to make the app popular and get it featured. Some practices can help you in getting your app featured on the Google Play Store such as working on the recently launched or trendy technologies, visual designing, localization, and more such.
Getting your app featured can provide various benefits to the application and helps in increasing the number of users to the application in numerous ways.
Also read:-How Much Money Can You Make from an App in 2022?
What Necessary Steps You Should Follow After Submitting The App?
Right after submitting the app to the Play Store, you might wonder, What next?
Well! We have come up with this solution as well.
You can involve in practicing the following steps in order to make your app globally attractive and user-centric:
- Promoting Your App
In order to quickly make your application popular, there is no other medium as fast as Social Media. According to a research conducted by Global WebIndex in October 2021, more than 57% of the world’s population is involved in Social Media, and these stats easily explain the power of Social Media. Some of the most popular Social Media platforms are Instagram, Pinterest, Facebook, and more. In this way, if you promote your app on these platforms, the chances of more downloads and user engagement will efficiently increase.
- Practice App Update and Maintenance
After publishing the app, there is a need to update and maintain your application consistently for the betterment of the app. By fixing several bugs and issues and implementing regular updates will efficiently help you in keeping your app healthy and maintained.
What Is The Total Time That An App Takes To Publish?
The time required to publish an app on the Google Play Store is not fixed. Although the app publishing process through Play Store Console is quicker and easier, the time duration required by the app to get selected and reviewed varies. It can take from hours to a few days. This means after publishing the application, you should wait patiently for some time.
How Much Is The Cost For Publishing An App To Google Play Store?
The cost of putting an application to the Play Store is $25, which is a one time registration fee that you need to pay for the first time while publishing the app. After this, all the apps that you will submit to the Play Store will be free of cost.
Also Read:-How to Integrate Twitter REST API in Swift to Make Seamless Interaction With Twitter
Conclusion
We hope our article will help you in submitting an Android app to the Google Play Store by following all the mentioned app publishing steps in the correct flow. After uploading the app successfully, you should plan about the maintenance and upgrades of your app, which is a wise practice to keep your app live on the Google Play Store. Also, adopt attractive branding strategies to engage a mass audience to your app.

A freelancing blogs and e-books writer who keeps you up with the trending technologies and user guides. A blogger who is currently a post-graduate living in United Kingdom and trying to make her niche as a Data Scientist. Before taking a deep dive into the "Data-World", she got a Bachelor's Technology degree in Computer Science and has always dreamed of writing as a kid which inspired her to write wonderful content with the right amount of technical terms to make it easy for the beginners and as well full-fledged developers to grasp a hold onto the computer technologies.